Breeze Block Installation and Care
Applications
Click here for our Breeze Block Installation Instructions in Spanish. Oprima aqui para Instrucciones de Instalación de Bloques de Brisa en Espaniol.
Decorative Breeze Blocks can be used indoors or outdoors as space dividers, property line markers, feature walls, and sun-exposed accents. Please note: Breeze blocks are not structural and should not be used in load-bearing walls or in places where people may sit, climb, or lean. For pool enclosures, confirm that block openings meet your local safety codes. Installation is typically not a DIY project. Consult a mason, structural engineer or licensed contractor who understands your city’s permitting and code requirements. Many municipalities limit the height and placement of non-load-bearing concrete structure. Before ordering, confirm that your project complies with local codes and whether a permit is needed—returns are costly. If you are working with breeze blocks from a different supplier, please refer to their instructions. Please read all instructions before proceeding.
Before Installation
For outdoor installations, ensure that you are planning your installation on a day with a moderate temperature for your climate, and at least a month before there is any chance of freezing temperatures.
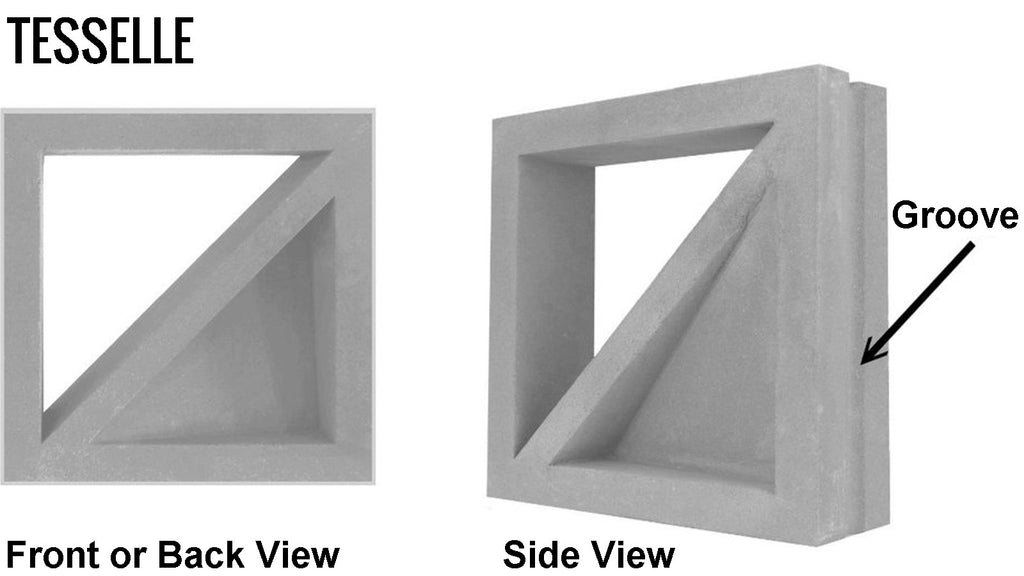
Plan your layout carefully. All of our breeze blocks come with a groove on 2 or 4 sides of the perimeter to accommodate rebar in the installation. Some breeze blocks have one design option, while others can form different patterns, depending on the layout.

Wall Placement
Your local planning department may require a permit for your structure. Your city may have restrictions pertaining to where your wall can be placed with respect to property lines and other elements, such as driveways and sidewalks, and will have minimum requirements for masonry walls which may be more or less stringent than Tesselle requirements below. If city requirements are more stringent, follow their instructions. If Tesselle requirements are more stringent, follow our instructions.
For more complex installations, consult a structural engineer. Here are examples of commercial projects completed with professional guidance:
Desert Horizons
Porta Via
Rhumbar
Fleming's Steak House
Fogo de Chao
Foundation/Footing/Placement
A licensed, local professional should determine the depth and width of the foundation. This will be based on the local codes, soil conditions, drainage, annual and daily temperature variations, and the weight of the wall. The footing should be perfectly level and incorporate high strength concrete and #4 rebar.
Columns/Piers should be embedded in the foundation. A row of blocks that match the base row may be included under the foundation surface, and may be needed in transition areas if the wall is being built on a slope.
Use a 1/2 - 5/8" mortar line on the base courses and between blocks.
Plan the placement of the vertical rebar (which needs to be placed every 24" or less, and into a concrete bed and not be driven into the ground).


Wall Width and Vertical Columns/Piers
Vertical Columns/Piers are required for wall strength and stability. Tesselle breeze blocks require a vertical column on either side of the wall for walls up to 42". For low, free-standing decorative walls, see our blog post, where a professional mason outlines the construction process.
Any wall over 42" will require a column at a maximum of every 10' in width as illustrated above. Columns may be made of cinder block (typically a 12"x12"x8" column cinder block) with vertical #4 rebar inserted and ultimately encapsulated in concrete that embeds in the foundation. Holes should be drilled in the sides of the column to accommodate the #2 or #3 horizontal rebar. Piers can also be custom fabricated out of 4"x3" steel tubing with holes drilled though them or tabs welded on to accommodate the rebar.
Allow foundation to set overnight before proceeding.

Maximum Height
The maximum height for any Breeze Block wall is 6' before professional structural engineering is needed - see an example below of a breeze block structure supported by a customized steel frame.

Laying the Breeze Blocks
Soak each Breeze Block for about a minute in water before setting. This will prevent the block from absorbing the moisture from the mortar. Handle blocks with extreme care during this process.

Quikrete Mason Mix Type S is recommended for mortar mix. Quikrete Masonry Bonding Adhesive or Concrete Acrylic Fortifier may be added.
Working towards the center, lay two breeze blocks next to each pilaster block or vertical support to create the first course.
Insert rebar every 24" or less, both vertically and horizontally. The thickness of the mortar line should be between 1/2" and 5/8".
When the mortar has become firm, smooth the joints with a jointing tool.

Ensure stability after each row before building higher.


Above: example of breeze blocks being installed inside a steel frame.
Laying the Capping Stones
Once wall has been built to desired height the wall should be capped with Tesselle Universal Breeze Block Finishing Caps. They can also be finished with bricks, blocks or a steel plate.
Embed a layer of wire mesh or rebar into mortar and lay the capping stone.

After Installation
Soak the wall for 7 consecutive days after installation to complete the curing process. Because they are made from a natural material, our blocks may contain up to 1% iron oxide which will appear as a rust stain when the blocks are soaked. These will disappear when the bock dry out. Certain sealers may make the iron oxide content more visible.

Sealing and Painting
Wait at least 30 days prior to adding any finishes such as primer, paint or sealer, ensuring that the blocks are clean and dry at the time of application. We recommend you consult with your local Benjamin Moore representative to determine the sealer, if applicable for your environmental conditions. Sealing is recommended for locations where temperatures fall below freezing.
If you are sealing your blocks and want to closely maintain the matte finish of the Breeze Blocks, we recommend applying Miracle 511 Porous Plus or Stain Proof by Dry Treat, which are clear, or Zinsser Hidz Multi-purpose Primer and Sealer matched to your natural block color or paint color, and then Benjamin Moore Regal Select Moorlife Exterior Flat Finish Paint.
Color matching: Below are Benjamin Moore paint colors that closely our Breeze Block colors to match structural elements or in case the blocks need a touch-up - (our colors will vary slightly from lot to lot, and may have variation within the block, so please bring a block with you to ensure that it is the best match for your installation):
- Bay: 2062-40
- Coal: 2133-30
- Cocoa: 2107-40
- Dahlia: HC-66
- Espresso: HC-71
- Grey: 1475 or 1476
- Grey (New Grey): AF-715
- Harvest: 2160-20
- Jade: 678
- Leaf: HC-118
- Plateau: HC-28
- Quarry: HC-65
- Quince: 2092-40
- River: 2062-40
- Rose: 2171-20
- Saffron: 2154-30
- Sand: OC-32
- Scarlet: HC-51
- Taupe: 2107-50
- White: OC-20
- Zest: AC-12
Cleaning
Breeze Blocks are made from a porous material and may stain when exposed to certain conditions.
- Many stains will bleach out over time with sun light.
- If the 30 day curing process is complete, breeze blocks can be power washed.
- Clean with a pH neutral detergent, such as Zep.
- We also recommend Miracle Liquid Poultice and Miracle Heavy Duty Cleaner (Acid Substitute) occasional deep cleaning.
- Some stains can be removed by hydrogen peroxide or muriatic acid.
- For red wine stains, use Wine Away.
- For shallow stains, try sanding with a fine grit paper.
- Stains can be hidden by primer and paint. We recommend that you match your primer and paint to the natural block color. Zinsser Hidz is an excellent primer and sealer. To maintain the natural look of the block, we recommend a flat finish paint such as Benjamin Moore Regal Select.
Maintenance
- Avoid water accumulation
- Saturated colors may fade in direct sunlight.
