Here is our story of building a breeze block garden wall. We will take you through the process, step by step.
I'm Karin, owner of Tesselle, and my husband Dan and I decided to beautify the neglected corner leading into our subdivision of custom mid-century modern homes in Riverside, California. Below is a rendering of the transformation we planned, using Tesselle 11.4" Grey Incline Breeze Blocks in a chevron layout. We chose this pattern because our home is made from poured concrete and has a chevron theme that repeats subtly across the dwelling and landscape.

Step 1: Review your concept with the City Planning Department
We learned from the City of Riverside that we would not need a permit since our plans called for a garden wall that was less than 42" high, and there was not a requirement for intermittent columns across the 24' span. Please note that your city may have different requirements, and that in addition to structural requirements, they may have restrictions with respect to distance from property lines, driveways and sidewalks. Always remember that Breeze Blocks are decorative; they can't be used in load bearing applications, and are not appropriate for retaining walls. Please note that if you purchased Breeze Blocks from another resource, you should follow their installation guidelines.
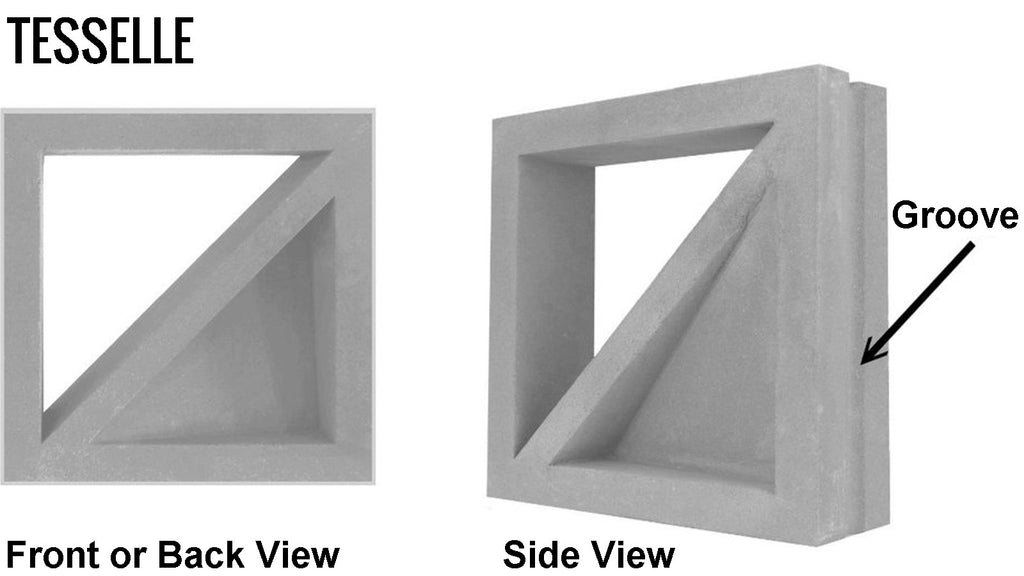
Below are close-ups of the Incline Breeze Blocks, showing the groove around the perimeter to accommodate rebar in the construction process.
Step 2: Hire a Local, Licensed Professional
Masonry walls are generally not DIY projects - they involve technical skill, understanding of how the materials will work with the soil at the site and local environment, including weather extremes and daily temperature variations, plus they require equipment that most of us don't have in our tool sheds! We chose to work with Shawn Goodsite and his team, including Pablo Ramirez and Kalin Goodsite, from Goodsite Custom Masonry, in Riverside, CA. In addition to being a top notch mason with decades of experience, Shawn has also made appearances on Brett Waterman's Restored, an HGTV program, so he's a natural in front of the camera! With Kalin filming all of the footage and photos, Shawn generously agreed to explain his process, step by step.

Step 3: Select the Materials
In addition to the breeze blocks, you'll need blocks for the columns, the base course, and capping. Shawn recommended we check out the options at La Cadena Masonry Supplies in the nearby city of Colton. It was quite eye-opening to see all of the options. Because we did not want to distract from the breeze blocks, we chose plain, grey 12x12x8" blocks for the columns, 8x8x6" half blocks for the base course, and standard 8x4x2" grey bricks to cap the top of the wall. Shawn also specified high strength concrete (called "grout" in the masonry industry) for the footing and to fill the voids in the structural blocks, mortar, which binds the blocks together, reinforced steel rods for the footing and structural elements, and #2 rebar to lay vertically and horizontally between the courses of breeze block.

Step 3: Plan the Footing and Structure
We ran into a small snag when planning the footing (foundation), where we learned that there was an elevation gain of 17" from the left side of the wall to the right side. I never would have guessed this, but it was discovered using a Spectra Precision Laser Level, which is the equipment used to set the Level Line. Of course the pros from Goodsite were not surprised - this is an everyday occurrence in their work! The Laser Level was used throughout the installation process to ensure that we were building a proper structure.
![]()
To address this, the plan was that, in addition to moving dirt from right to left, we would stack the base courses of half blocks two high on the left side and one block high on the right, with the top row providing a level line for us to lay the breeze block course. Prior to digging the trench, we finalized our plan for the structure, which shows how the wall will be constructed, and how the breeze blocks are anchored to the columns and footing.

Step 4: Dig the Trench
Shawn recommended a 16"x16" trench based on the weight of the wall, the fact that we never experience freezing temperatures (which would require going deeper than the regional frost line), and the rocky soil conditions. A jackhammer aided in the effort to dig the trench below:

Next, we received the materials that we specified with La Cadena Masonry Supplies.

Step 5: Lay the Footing and Base Courses
Getting the footing (or foundation) for your block wall right is among the most important steps. Just a reminder, this footing is for this specific breeze block garden wall that is being built in a temperate environment in very solid earth. Consult with your local professionals to determine the footing requirements for your project. These steps require a lot of preparation, as they need to be accomplished before the concrete hardens. Below, Shawn shows us the right consistency for the concrete to be poured in the trench.

Next, Shawn explains the importance of elevating the reinforced steel so it is encapsulated by concrete in the footing. He accomplishes this by pouring "mud" every 5' across the length of the trench and lifting the steel to place it above the ground.

Next, after pouring a section of concrete, Shawn demonstrates how he begins setting the first course of structural blocks along the level line, starting with a larger Column Block (right) and a Half Block with a 1/2" vertical gap between them. This requires that the blocks are pressed down into the concrete about 1.5". He positions the level in different directions, adjusting the blocks until they are perfectly aligned.

Next, Shawn drives reinforced steel rods into footing through the column block, and after setting a few more of the Half Blocks, he demonstrates how he temporarily sets the Breeze Blocks to drive the #2 rebar into the concrete footing, so it will be positioned to align with them later when they are installed. Rebar is placed at minimum, between every 2nd course of Breeze Block, both horizontally and vertically. Rods and rebar should be driven solidly into the concrete, but not into the ground below, as this could cause corrosion.

Because Tesselle Breeze Blocks are made offshore and are based on the metric system, they will not match up perfectly with standard US-made blocks, so as Shawn placed the rebar, we inevitably ran into a situation where the edge of the half block would have prevented us from properly placing the rebar, so Pablo stepped in and cut the block, allowing for an open cell where it was required. A construction dust respirator mask should be worn when cutting and mixing concrete products.


After the half blocks are laid according to our plan, mortar is applied between them, then Shawn uses a wet sponge to remove excess mortar.

The next step was to fill the voids in the structural blocks, including the columns and the first course, with high strength concrete, and to apply mortar between the blocks.

Step 6: Installing the Breeze Blocks
Prior to installation, Shawn and Pablo "dry laid" the first course of Incline Breeze Blocks to make sure that the wall would come together as planned. You can also see the top of the below ground layer of Half Blocks that were laid in the left side of the trench. There is a lot of multi-tasking happening during this process, including ensuring that there is fresh mortar at the right consistency at all times.
Because of the complexity of the finished chevron pattern, the Goodsite Team drew arrows on the tops of each block to make sure they would be placed properly.
 All looked good, so we are ready to start installing the breeze blocks. Prior to installation, breeze blocks should be soaked in water.

While the Breeze Block soaks, Pablo spreads mortar below where the block will be placed.
Below, Shawn lays the first Breeze Block.

Keeping the base course wet as the mortar is applied with help with the curing process, improving the strength of the wall.

Shawn recommends using a rubber mallet for placing and leveling the blocks and mentions that the blocks need to be handled with care at this stage.

Shawn uses several different levels as each block is laid, making minor adjustments to ensure perfection. This one below is the "four-footer" that he frequently lays across multiple blocks. It is critical to be able to work quickly and accurately when you are dealing with high temperatures and mortar that has the potential to dry quickly - this is one area where a professional mason will bring valuable experience to the project.

After the first course is laid, rebar will be placed in the groove at the top of the blocks, and holes have been drilled into the columns so that the rebar can be inserted into the column prior to it being filled with high strength concrete. This is an important step to ensure that the wall has both horizontal and vertical strength. Since the breeze block portion of our wall is 3 courses high, and rebar is required between every 2nd course, both horizontally and vertically, we chose to plan rebar between both the first and second horizontal course, and the second and third course.

Next, after having laid the horizontal rebar, using a Round Joiner and a Margin Trowel, Pablo shapes and refines the mortar between the blocks.

Next, Pablo preps the "bed joint" for blocks in the second horizontal course.

Below, the team is finishing up the third, and last, horizontal course of breeze blocks.

Step 7: Finishing Touches
After the breeze blocks are in place, Pablo cuts and installs 2 column blocks where the tops will be flush with the top of the breeze blocks.

The column is then filled with high strength concrete. This will encapsulate the vertical reinforced steel and the horizontal rebar, resulting in a wall that, when cured, will be strong and beautiful.

Here, the Goodsite Custom Masonry pros start laying the capping bricks.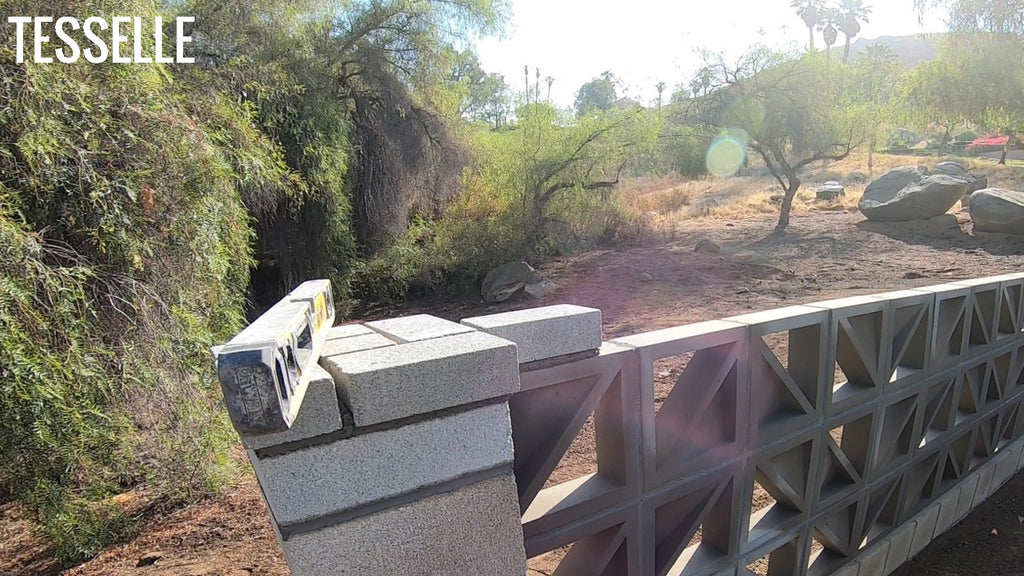
The last brick is laid, and Shawn checks for levelness while Pablo puts the finishing touches on the mortar.
Step 8: Adding Moisture for Proper Curing
It is commonly believed that concrete "dries" but it actually "cures" and to cure properly, a masonry wall needs moisture. The wall will seem "finished" within 24 hours, but it will take approximately 28 days for the wall to complete the majority of the curing process, meaning that all of the elements have bonded. To ensure proper curing, the wall should be soaked daily for the first seven days.

Step 9: Enjoy the Finished Breeze Block Wall
The wall is complete! We are thrilled with the finished look, and we appreciate all the structural details that are no longer visible. 
When we purchased the Palo Verde Trees, we learned that the trees with the maturity of those in our original rendering cost $3000 each, so we chose smaller trees that were in full bloom when we brought them home, but we'll have to wait until Spring to see their beautiful yellow flowers bloom again. Fortunately, these trees are fast-growing. We added red lava rocks, agave plants and cacti in front of the wall. Below are Palo Verde flowers, which we expect to bloom from March-July.

We also added solar lights to illuminate the wall at night.

We will post more photos as the light changes and the plants grow!
If you're ready to start your breeze block garden wall project, start shopping here, and if you happen to be in Riverside, we hope you'll contact Goodsite Custom Masonry to ensure a beautiful, long-lasting outcome!
